Saturday, January 26, 2013

Creating Dynamic Tables with jQuery

I have been doing some search on a decent tutorial on how you can create and modify dynamic tables with jQuery but I was not so lucky, and I thought about writing one, myself. Let's get to it, then! 

Example Scenario:

In this example, we would like to insert a passenger's name and gender inside a list. The list will be dynamically created, of course.

1. Create the table's empty layout:

While you do not have to create your table per se, but a table layout is needed. Take a look at one way you can do this:

Passengers' List
ID Name Gender Row Operation
Also we would need to enter the passenger's name and gender. We do so by declaring an input textbox and drop-down list. Note that a button is supposed to fire up the event to insert the values in the dynamic table:
Enter passenger's name: 
  Enter passenger's gender: 


2. Add rows to dynamic table:

First step is to handle the click function of the Add Passenger button.
$('#add-new-passenger').click(function(){
  var passGender = $('#new-passenger-gender').val();
  var passName = $('#new-passenger-name').val();

   counter++;
   var row = $('table.passenger-list').find('.passenger').clone();
   row.attr("class", "")
   row.find('.rowId').html(fcounter);
   row.find('.rowName').html(passName);
   row.find('.rowGender').html(passGender);
   row.find('.rowLink a.delete').html('Delete');
   $('table.passenger-list').find('tbody').append(row);
 });


The challenge here is that we used the clone() function of jQuery to copy the layout of the first row, then we used the find() function to retrieve a row and then set the html attribute of each row according to the dynamic table layout of ours. Then one can select the table and finally appended the row to the table.


3. Delete rows from dynamic table:

This part somehow needs the smallest peace of code and at the same time can be a little bit tricky for some guys. What I encourage people to avoid using the old depreciated live() function, and as jQuery recommended use on('click', '', ) instead:

$('table.passenger-list').on('click',  'a.delete', function() {
  $(this).parents("tr").remove();
 });

As you can see, after handling the click event of the link within delete class, we select the parent row and perform deletion.

Tuesday, January 22, 2013

How to resolve 'Could not find the required version of the Java(TM) 2 Runtime Environment'?

I was encountering the 'Could not find the required version of the Java(TM) 2 Runtime Environment' error when I was trying to install JDK 64-bit on my 64-bit Windows 7 machine.

The reason for throwing such error is that JDK installer is written in Java, therefore you need to have JRE installed. I assume that this is a bug in the Java installer somewhat, because after installing JDK EE, you will have a JRE inside that as well, so you end up having two JREs. Surprisingly, if you install JRE 64-bit and set your %JAVA_HOME% and path variables, you will still see that issue remains the same.

Solution is that you should install JRE 32-bit instead of 64 bit version of JRE. If you install it, then you can install JDK EE or/and Glassfish via the installer. This might sound strange but it is true!

Wednesday, January 16, 2013

Add rows to HTML table using jQuery


Add Title Here


First HeaderSecond Header
Add Row
Find it in JSFiddle: Add rows to HTML table using jQuery

Wednesday, January 9, 2013

Create a Dynamic Web Project with Maven in Eclipse Juno

Recently, I began to show my interest to start using Apache Maven in nearly all of my projects. Today, I was  trying to get hold of creating a Dynamic Web Project (Jave EE) project using the M2Eclipse Plugin, which is a fascinating tool to work with, but is tricky as well. While there are other related posts like here, they are outdated and in case you will follow them, you will be exhausted.


1. Prerequisites

You have to have the followings in advance:

  • Eclipse Juno for Java EE developers
  • JDK 1.6 or above
  • Apache Maven 3.0 or above
  • M2E Plugin (You can get this easily by searching it in the search bar of Eclipse Market Place inside the Help  menu of your Eclipse)
  • Apache Tomcat 

2. Create a Maven Project

2.1 Plugin Prerequisites 

You need to have a plugin called M2Eclipse which you can fetch it via Eclipse Marketplace (In case you do not know, just browse to Help and then you can find it there)

Some of you may not know but you also need another plugin called Eclipse WTP plugin. The latter is the plugin that lets you run Web Applications with Built-in servers. Have a look at the plugins you need to have  in advance:


Also note that there is another Maven Eclipse WTP plugin which is not depreciated in favor of the one you can see in the above picture. Everytime you need to install a plugin, you also need to restart your Eclipse.


2.2 Create your project

This step is just simple and easy. First, click on File, then go to New and click on Other... . In there you can search for the word "Maven" and you will get the following options:


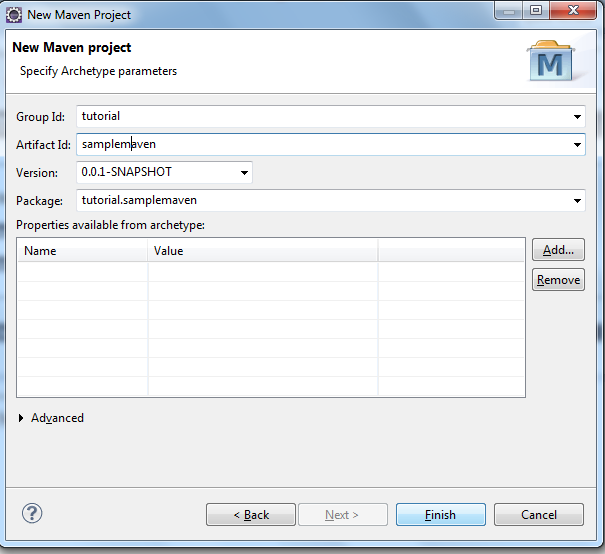
Then, simple click on the Next button and in the next dialogue, select maven-archetype-webapp move on:


And the final step is to name your project:


You should by now see the following structure of your project with the new look:


Notice that you have your Deployment Descriptor which enables you to run it on Eclipse's internal server. Open your pom.xml and change it to the following:


  4.0.0
  telecom
  agent
  war
  0.0.1-SNAPSHOT
  agent Maven Webapp
  http://maven.apache.org
  
    
      junit
      junit
      3.8.1
      test
    
    
 javax.servlet
   servlet-api
   2.5


    agent
  

As you can see I just added the servlet-api.jar to the dependencies of the project, when later on we will have to compile our Maven project. Now, I will add a basic Servlet in the package src/main/java/servlet/HelloWorld.java:

package servlet;

import java.io.IOException;
import java.io.PrintWriter;

import javax.servlet.ServletException;
import javax.servlet.http.HttpServlet;
import javax.servlet.http.HttpServletRequest;
import javax.servlet.http.HttpServletResponse;

public class HelloWorld extends HttpServlet {
 private static final long serialVersionUID = 1L;
       
    protected void doGet(HttpServletRequest request, 
      HttpServletResponse response) throws ServletException, IOException {
     
             response.setContentType("text/html");
  PrintWriter out = response.getWriter();
  out.println("The app is up and running!");
  out.close();
  
 }

}


After that, add the servlet information and pattern in the web.xml which you may find under src/main/webapp:

  Archetype Created Web Application
  
      hello
      servlet.HelloWorld
  
  
      hello
      /hello


Now it is the time to compile the project. Here you have two options. First is to Right click on your project, then choose Maven and Click on Maven Clean and after that on Maven Install or else, run the following command inside your project directory:

cd /project/directory
mvn clean install

You can have your .war file in your target directory now and you can deploy it in your Apache Tomcat container, however the missing part here is that Eclipse does not know that your project is a web project, therefore you cannot deploy it in your local Apache Tomcat Server (Also your development Server). Every time you code, you need to compile and see the result in your Tomcat. Now we do two more steps so that we can have both the .war file and you will be able to run the application while coding in your tomcat server. First, go to Servers menu which resides in Window and then Show View:


And simply add a Apache Tomcat 7 instance, without changing any settings and click Finish.


3. Run the Project

Now, click on your project in Eclipse's navigation bar and click Refresh. As you can see, the project structure changes. Now you can simple right click on HelloWorld.java and run it on Server, as following:


And that is it! You now have a fully working Dynamic Web Project Maven Project in eclipse!


Remark: In contrast with a lot of tutorials out there, you should not manually change Project Facets of your project, while you are working with Maven projects in Eclipse. The project should read everything from your pom file and change the facets on the fly.

Sunday, January 6, 2013

Multi-Threaded Socket Programming in Java (Part II- Client)

As you saw in first part of Multi-Threader Socket Programming, we handled everything from the server's point of view. There are not so much thing going on at the client's side, and technically speaking you should bear in mind that client will not even know how the server processes its request. So the client part's code is not really dependent toward the context of threading obviously.
        
        Socket socket = null;
        PrintWriter out = null;
        BufferedReader in = null;

        try {
            socket = new Socket("Amir", 8081);
            out = new PrintWriter(socket.getOutputStream(), true);
            in = new BufferedReader(new InputStreamReader(socket.getInputStream()));
        } catch (UnknownHostException e) {
            System.err.println("Don't know about host: Amir.");
            System.exit(1);
        } catch (IOException e) {
            System.err.println("Couldn't get I/O for the connection to: Amir.");
            System.exit(1);
        }

As you can see, we initiated the socket with the Server Socket's name and port. The PrintWriter is getting the output stream of the socket so that we can later write on it and we also initialized an BufferedReader object to receive the stream of server's response.
        
        String serverMessage;
        while ((serverMessage = in.readLine()) != null) {
            System.out.println("Server: " + serverMessage);
            if (serverMessage.contains("MESSAGE RECEIVED"))
                break;
        }  

As you can see, listening for server's response and if the Server's response contains the String literal "MESSAGE RECEIVED", the loop is broken. This part is inside my very own protocol, and you can have whatever you would like to have there. Finally, you just have to remember to close the streams and sockets in order to avoid any resource leaks:

        out.close();
        in.close();
        socket.close();

So we are done. I tried to come up with something very easy and therefore you do not get lost in there. However, if anyone is interested in having a whole sort of real application up and running, take a look at the Source repository here: https://github.com/fidelio-coder/MultiThreadServer